The Lead Generation Tool is the tool that allows you to generate free SEO lead magnets to offer to your potential clients to start a lead generation process.
This will allow you to gain valuable new leads to increase your opportunities to provide SEO consulting services as a freelancer or if you work in an agency.
How to access the Lead Generation Tool?

To start using our software, simply click on the respective icon in the side menu on the left or access your dashboard from here.
How to create your first form?
Once you click the link or icon you will land on this page.
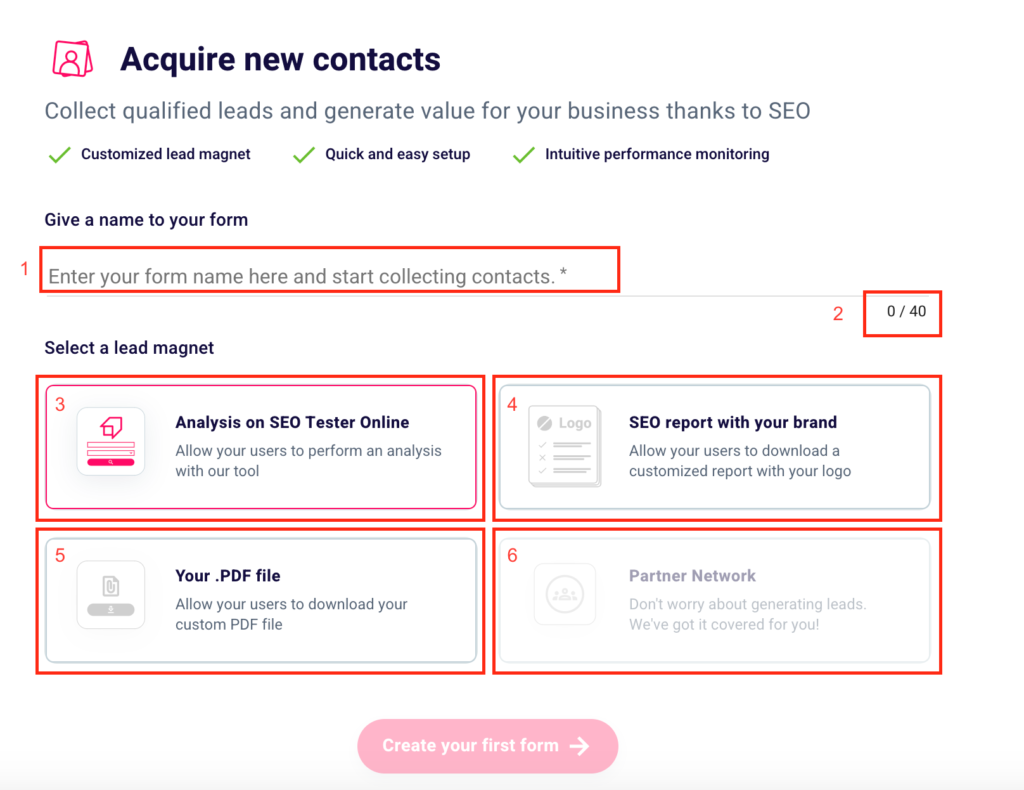
In order to start your first lead generation project and start acquiring new contacts, you must first give a name to your form, entering it in the appropriate box (1), keeping in mind not to exceed 40 characters (2).
Then you can choose one of the available lead magnets. You can give the possibility to the users who fill in your form to analyze their website or that of a competitor with our SEO Checker. If you prefer this option and want your users to be redirected to our platform click “Analysis on SEO Tester Online” (3).
In case you want to have your future leads to download an advanced white label SEO report, just click “SEO Report with your brand“(4). Want to have your prospects receive a custom file of yours? Choose the third option “Your .PDF file“. (5).
The last two choices mentioned above are only available to subscribers of a paid plan. In order to take advantage of the potential of “SEO Report with your brand” and “Your .PDF File“, you will need to subscribe. You can choose the plan that best suits your needs here.
The last alternative “Partner Network” (6) is currently unavailable. Follow our Telegram channel to find out when this feature will be activated and to keep up with the latest SEO News.
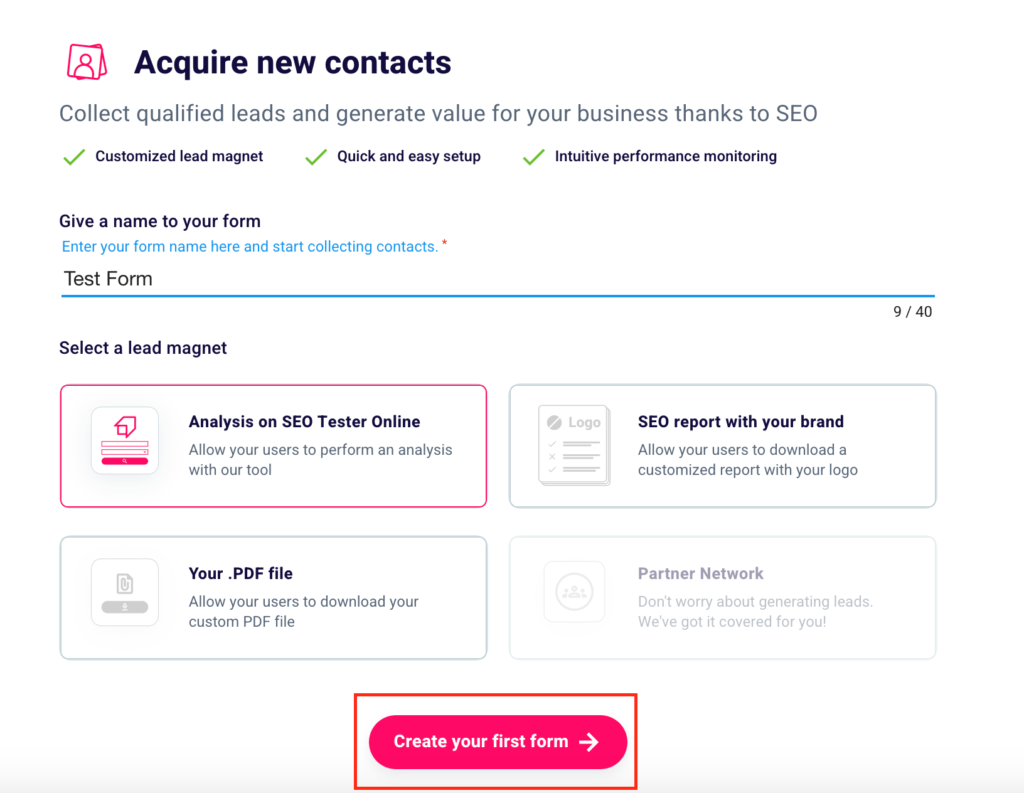
After naming your form and choosing the lead magnet to feed to your users, click on “Create your first form“.
How to create a new form?
You can generate a new form whenever you want by returning to the main screen of the Lead Generation Tool, clicking the respective icon in the side menu on the left or from here, and selecting the button at the top right “+ Create Form“. Form that we remind you, you can later insert on your site by pasting an embed.
What is an embed?
It is nothing but a small portion of HTML code that you will have to paste to the code at the base of your site (we will see how later) to make the contact generation form appear on your web pages.
The form will have the structure of the one presented on the right of this screen and will allow users of your site or users who visit the landing page on which you will install your embed, after entering their site name, their email, a keyword and/or other required data, to get an SEO analysis via SEO Tester Online, a white label SEO report or a file prepared by you.
When your prospect downloads their lead magnet, you will receive their contact and other information entered in the form. Fundamental information to undertake targeted marketing and sales actions in order to convert him from a simple user to a paying customer.
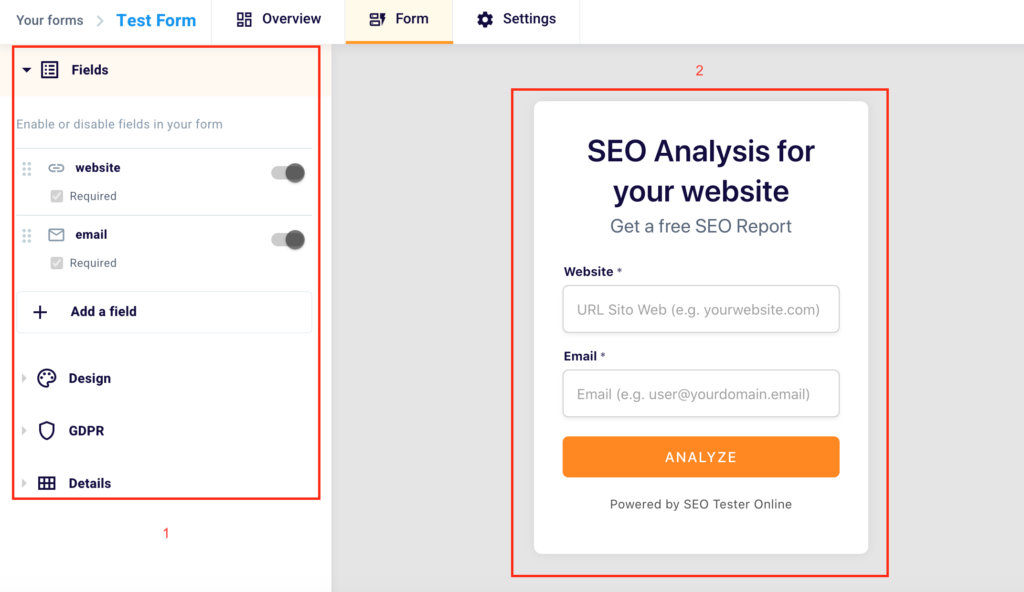
In the left part of the screen (1) you can decide the changes to be made to your form, while in the right part (2), instead, you can see them applied, in real-time.
Now that you have understood what an embed is, and what its function is, let’s see how you can customize your form.
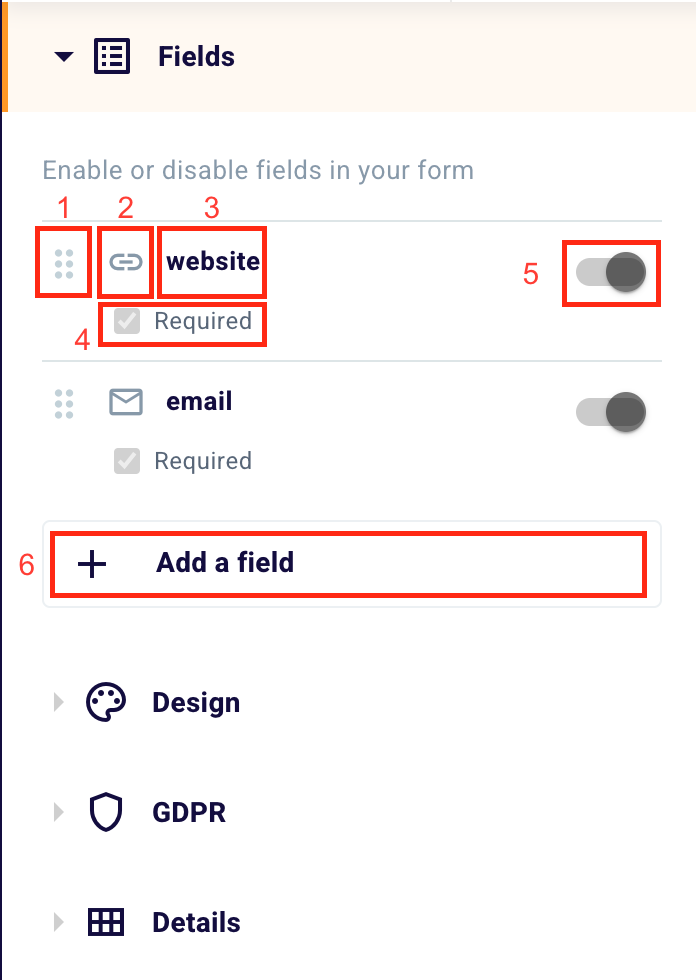
First of all, you can decide which fields to have your user fill in. With the drag and drop function (1) you can choose the order of the fields by dragging them. From the left to the right the type of field, indicated by an icon (2), the name of the field (3), in this case, “website”, the box “Required” (4) to check when you want to declare a field as mandatory and the toggle (5) to choose whether to insert a field or not.
In this case, both the box and the toggle are colored in gray as selected by default. Without this data, it would not be possible to carry out the SEO analysis that is the basis of the generation of contacts.
You can ask your user for other data such as email, keyword, phone, and name. Be careful, generally, a higher number of requested data generates more profiled leads but in smaller numbers and vice versa.
You can enter a new field by clicking “+ Add a Field” (6). You will land on this screen.
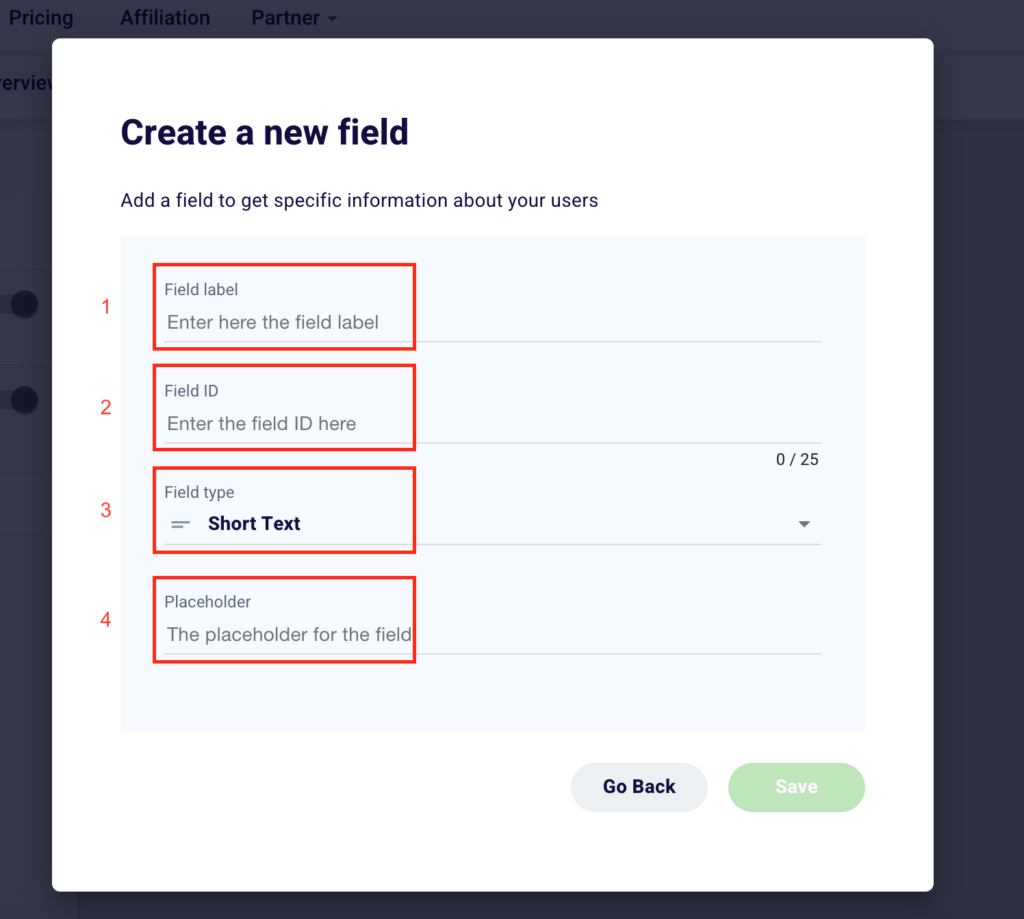
To create a new field, simply enter these four pieces of information. Enter in “Field label” (1) the name of the field you want to appear in the form. Once written it will automatically generate a “Field ID” (2) that you can change to your liking at a later time. Select from the 6 options available (short text, long text, link, email, select, hidden) the “Field type” (3) that best suits your needs and the information you want the user to enter in the form. Finally, choose a “Placeholder” (4) or a text that appears below the name of the field and that explains the action that your potential customer must take or shows an example of what to write.
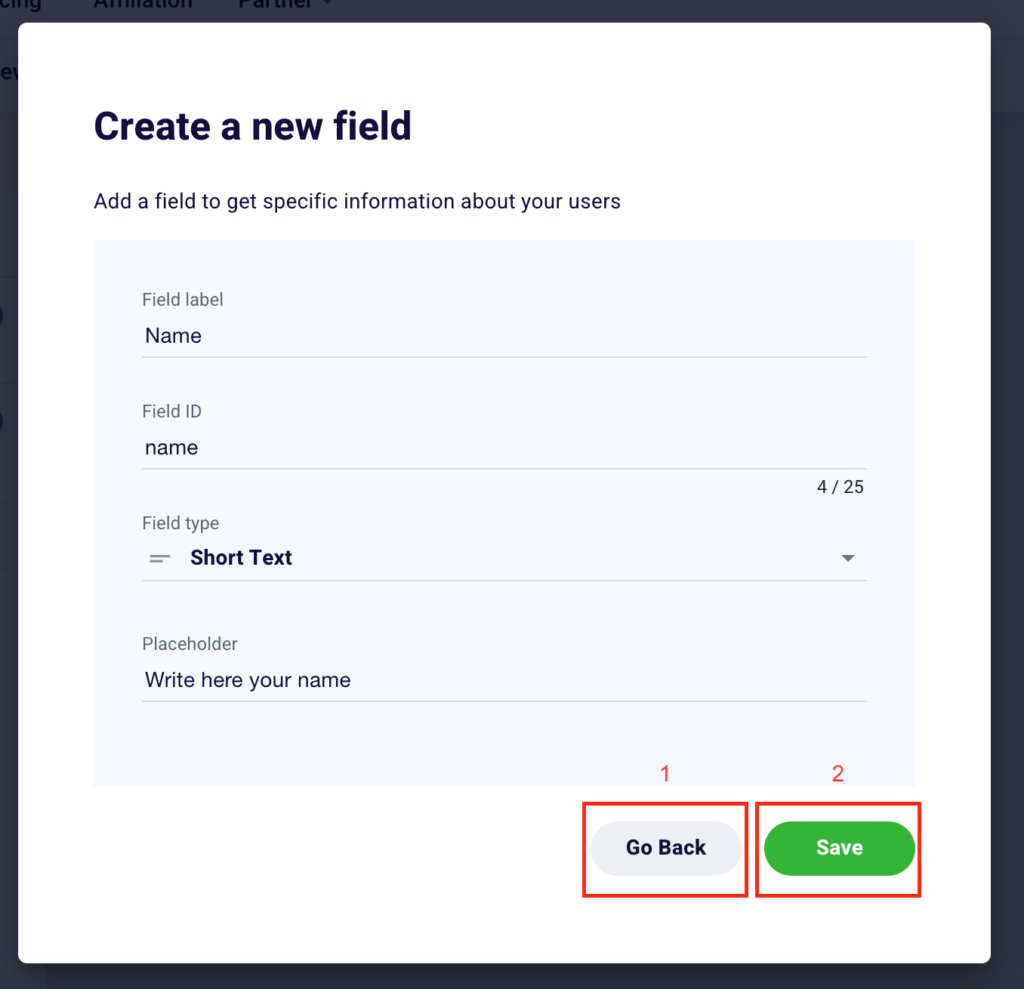
Click “Go Back” (1) to go back or “Save” (2) to permanently add a new field or confirm changes made to a pre-existing box.
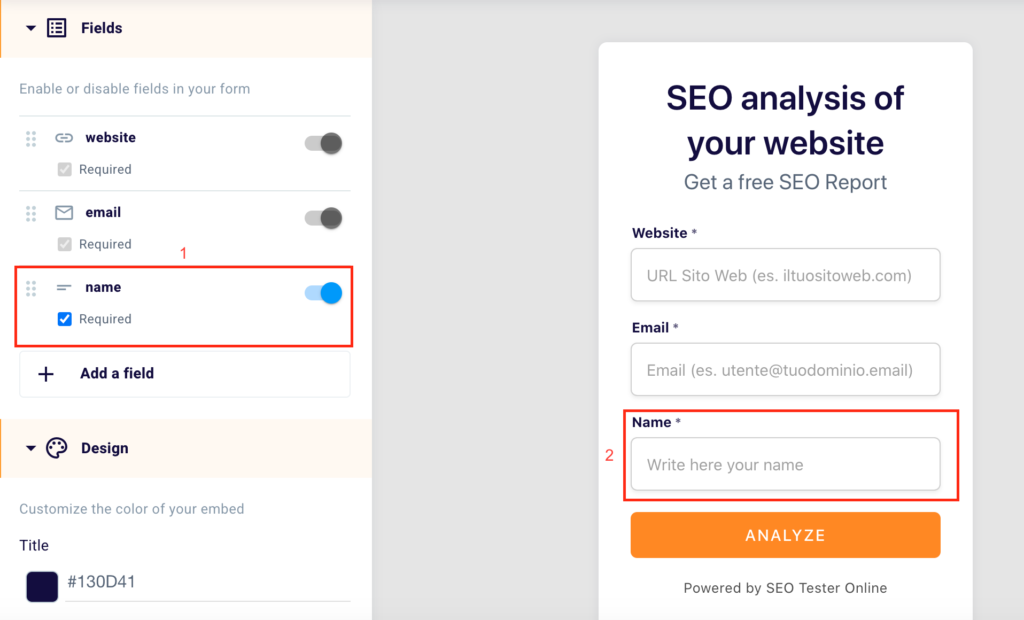
On the left, you can monitor the new fields added, set them as mandatory or not, and enable or disable them through the use of the toggle (as shown above).
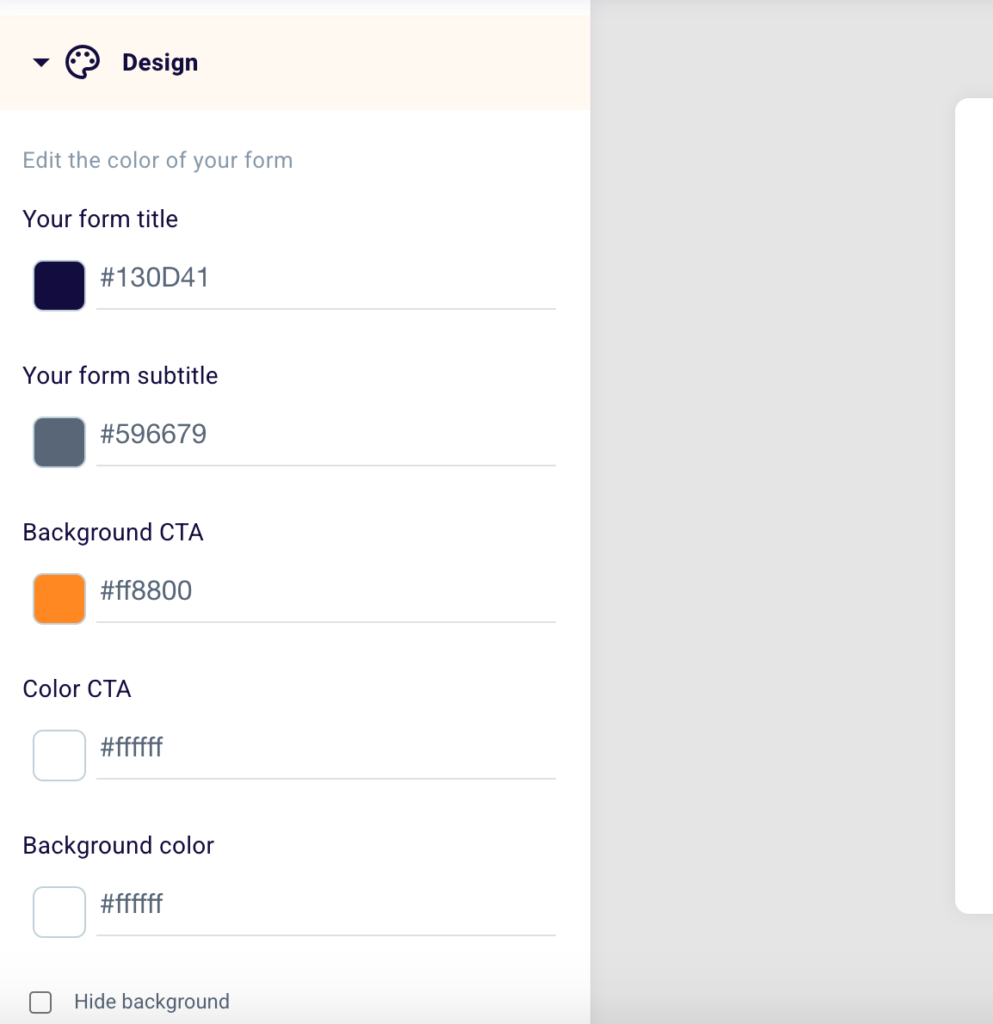
Scroll down to the design section, where you can change the layout of your form. We suggest, for the choice of colors, customize the form making it as much in line as possible with the design and brand image of your website.
The best option is definitely to stay true to your brand palette by choosing and entering the hexadecimal codes (color codes, e.g. #130D41) that you use for your site.
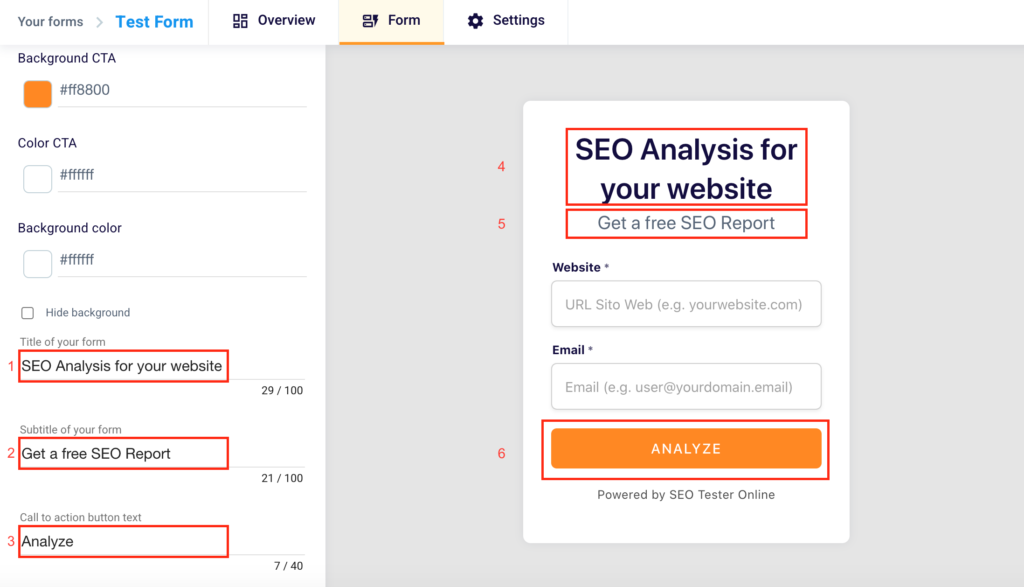
Do you want to insert a custom title in the embed shown to your users? Write it in the box below the words “Title of your form” (1). Remember not to exceed 100 characters. Explain to your potential lead what they will get after entering their information and clicking the button. You’ll be able to see the changes on the right side of the tool (4).
Want to give a different subtitle to the embed? Write it in the field below the words “Subtitle of your form” (2). Remember not to exceed 100 characters. You will be able to see your changes in the right part of the tool (5).
Do you want to modify the text of the CTA that will be shown in the button inside the form? Do it in the box below the text “Call to action button text” (3). Remember not to exceed 40 characters and clearly indicate the action the user will have to take to get his reward. You will be able to see the changes in the right part of the tool (6).
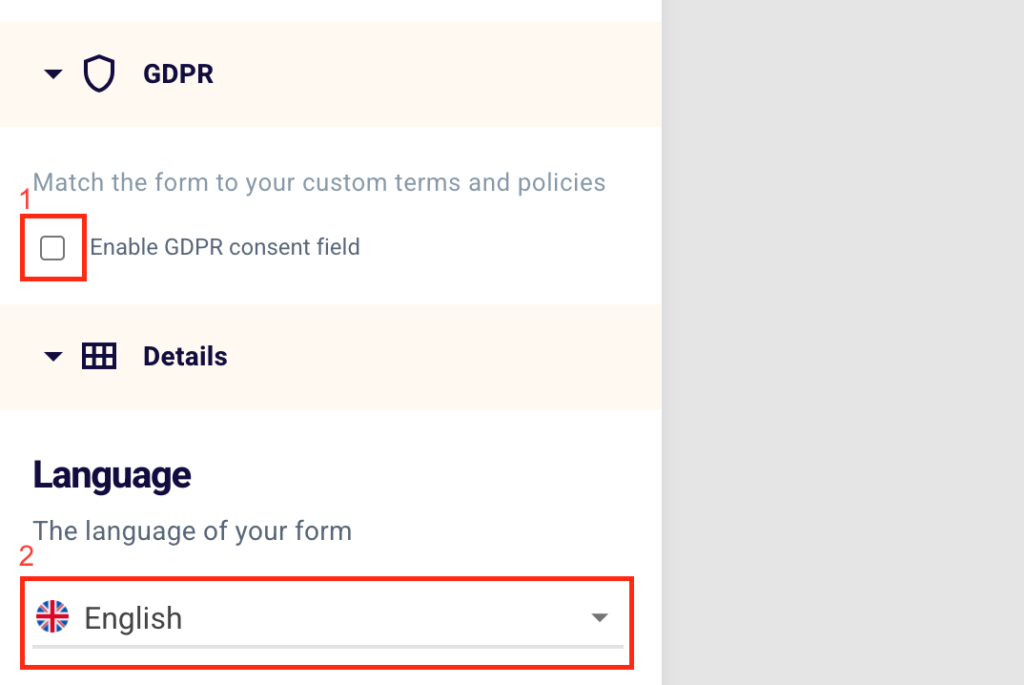
Do not forget to enable GDPR consent field (1), the General Data Protection Regulation, and remember to set the language of the form (2) by selecting Italian, English, Spanish and Polish.
How to enter the embed on my site?
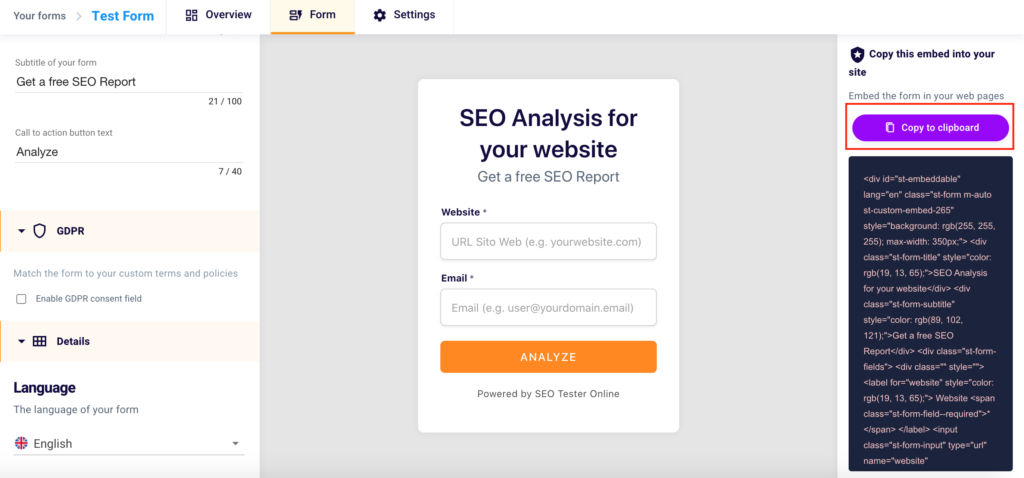
To copy the embed code to your own website or that of your clients, simply click on the purple button at the top right “Copy to Clipboard“.
How to edit the SEO report?

What language do you want your report to be generated in? Decide among the 4 available languages “English” (1), “Italian“, “Spanish” or “Polish“.
Insert your brand logo in the report by clicking “Upload” (2) and further customize the document that your user will download.
Edit the report header by entering your data (company name, email, phone, website, or any other useful information) in the appropriate field (3). Remember not to exceed 50 characters.

If you want to upload your logo drag and drop your image file or insert it by clicking “Upload” (1). Go back by clicking “Go back” (2) and click “Confirm” (3) to continue customizing the report. Remember that the image must not exceed 5 MB in size.
By default, the report that your users will download after filling out the survey will contain the SEO score of the page or site, a brief exam description, and a simple solution to the problem.
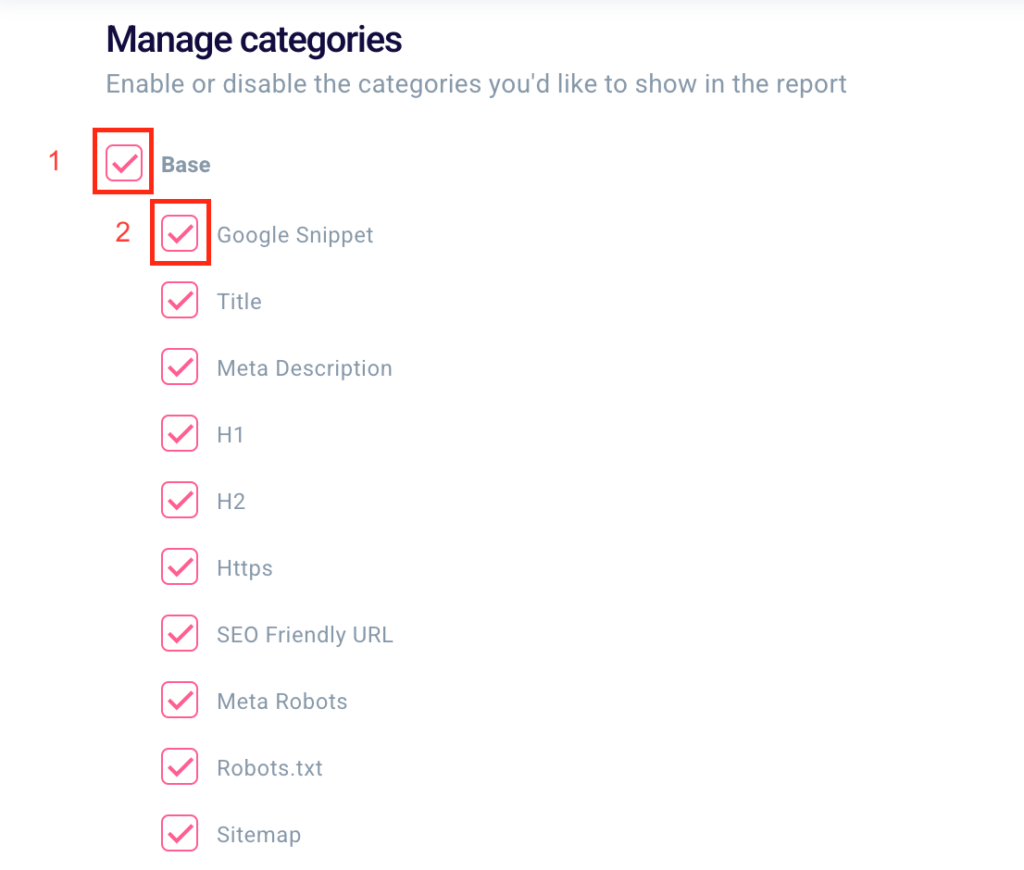
It will also contain all exams from all categories: Basic, Content, Speed, and Social. Selecting and deselecting work the same as in the situation described above and will allow you to include or exclude each of these aspects or exams.
You will be able to choose to select or deselect an entire category (1) or a single exam (2).
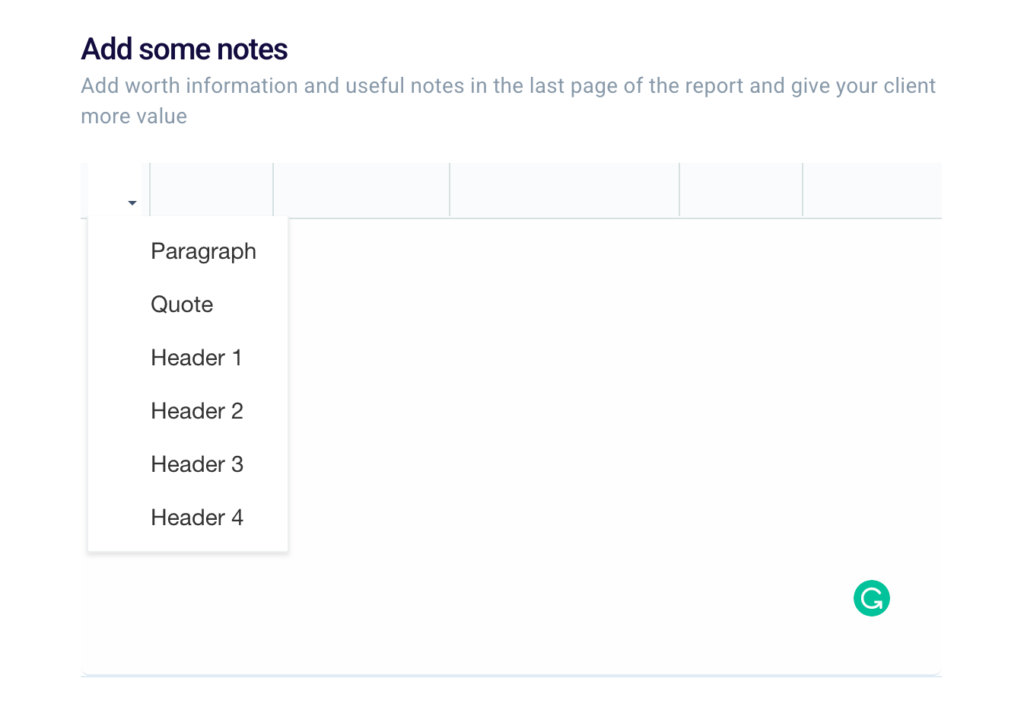
Finally, you can edit your report by setting paragraphs or headers in the last section “Add some notes“.
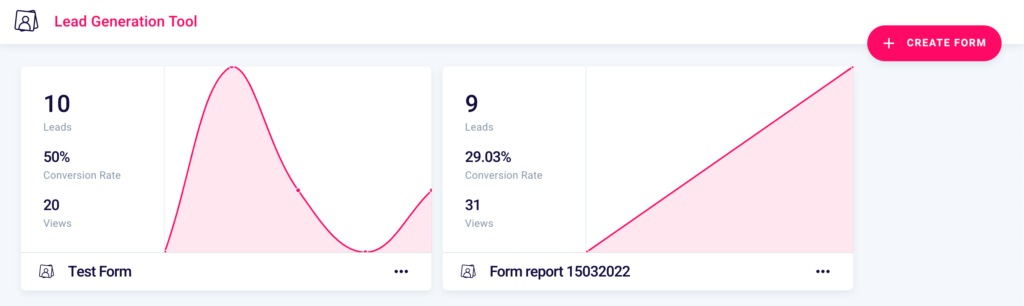
How to monitor the results of your forms?
Once created you can, at any time, track the results of your lead generation project through the dashboard of our tool, which you can access from here.
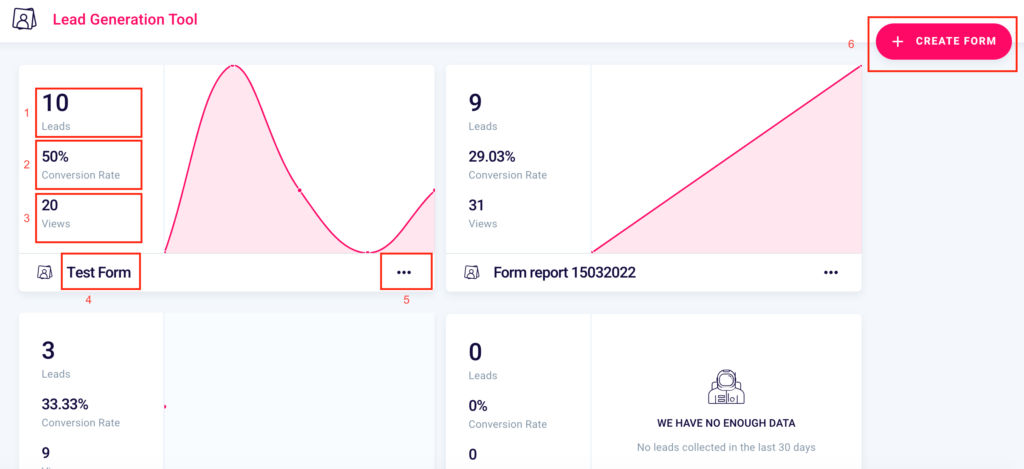
You’ll be able to see the number of contacts collected (1), the conversion rate of the form (2), that is the percentage ratio between the views of the form (3), and the number of leads obtained.
You will be able to create a new one (6), verify the name (4) and by clicking the 3 dots “…” (5) you will be able to:
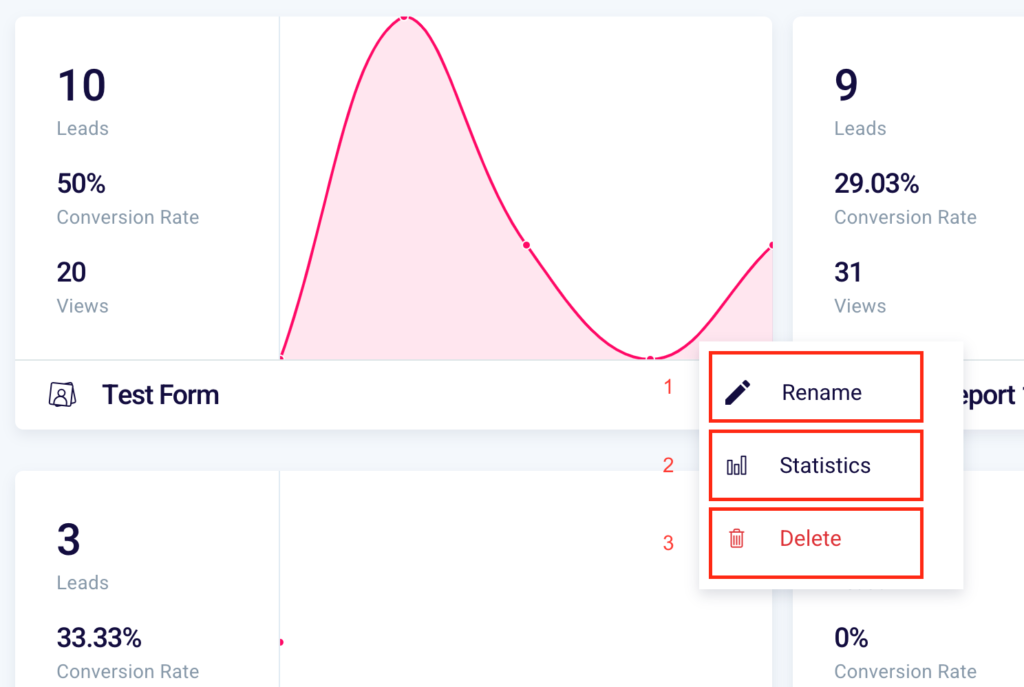
- Rename (1) the form
- View the statistics (2)
- Delete (4) the form
If you selected “Rename” on the previous screen, you can give a new name to your form by writing it in the box. You can undo this action by clicking “Undo“, going back, or confirm by clicking “Rename“.
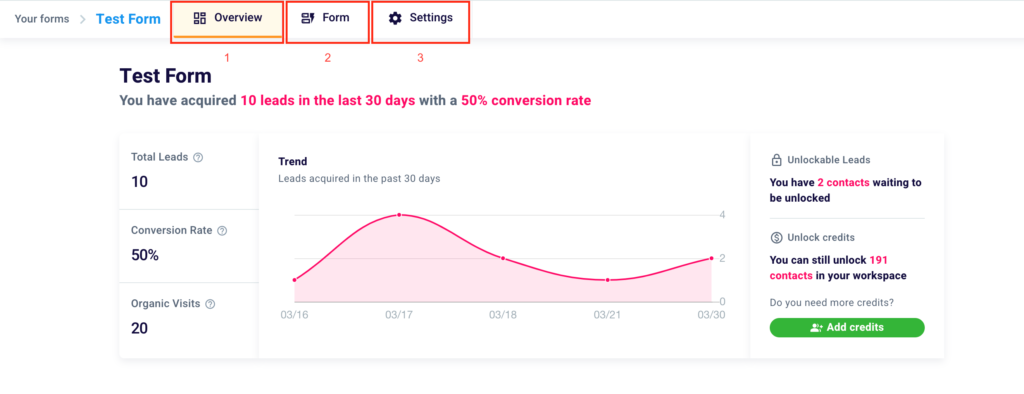
By clicking on “…” in the initial screen and then on “Statistics” you will land on this further screen for further information. Thanks to the menu at the top of the tool dashboard you can move between 3 sections: Overview (1), where you can view the data and metrics of your Lead Generation project, Form (2), where you can edit your contact form, and Settings (3).
How to interpret the overview section of the Lead Generation Tool?
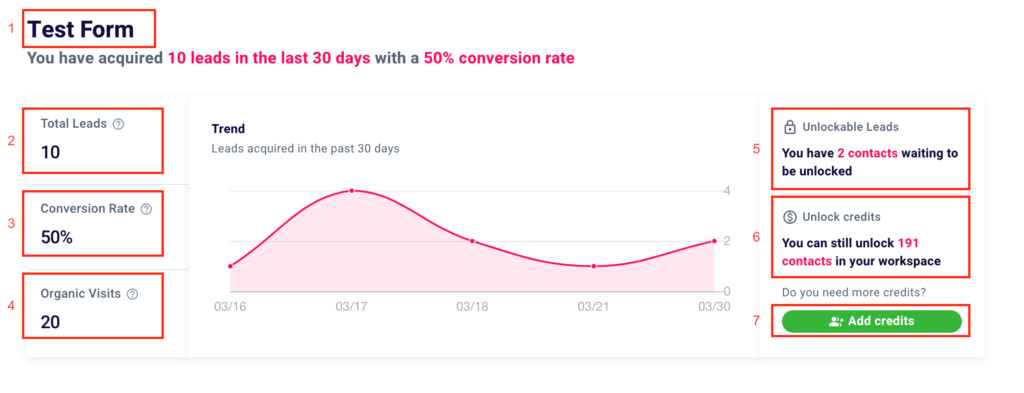
Once you have accessed the dashboard of the tool, you will have available in an all-inclusive screen all the data related to the performance of your form.
In the top left corner, you will find the name of the form (1). In the first box, you can see the number of contacts collected (2), the conversion rate of the form (3), i.e. the percentage ratio between organic visits (or views of the form) (4), and the number of leads obtained.
In the middle, there is a pink graph representing the acquisition trend, i.e. the trend related to the acquisition of leads during the days, weeks, or months in which the form was active.
On the same screen on the right the total number of acquired contacts that are waiting to be unlocked (5) and the contacts that you can still unlock (6) and therefore the total number of leads that you can still get information about. If you want to extend this limit, just click on the button “+ Add Credits” (7).
You will land on this page.
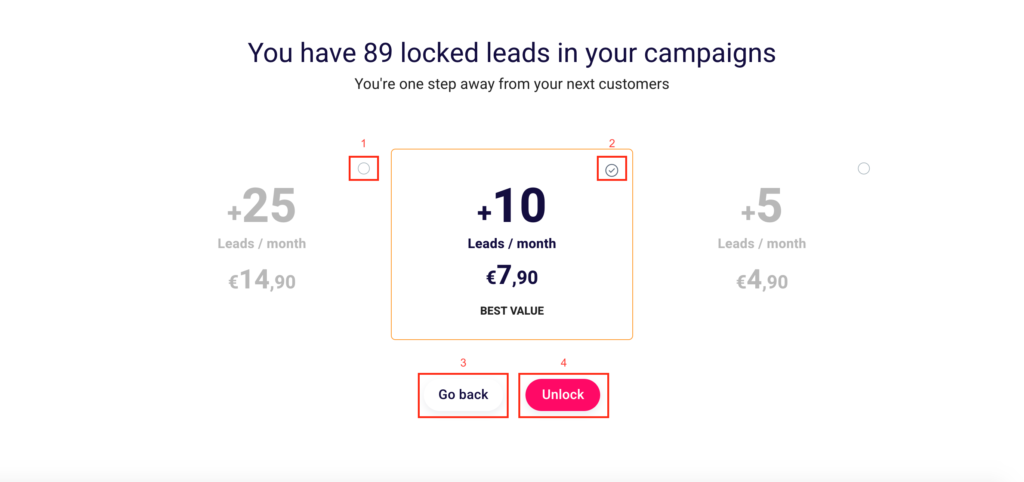
Choose the number of new contacts you want to unlock each month. Select the “+25 contacts/month” solution (1) or “+10 contacts/month“(2) and finalize your operation by clicking “Unblock” (4). To return to the previous screen click “Back” (3).
Also in the “Contacts” screen, scroll down to display a table with in-depth information for each lead.
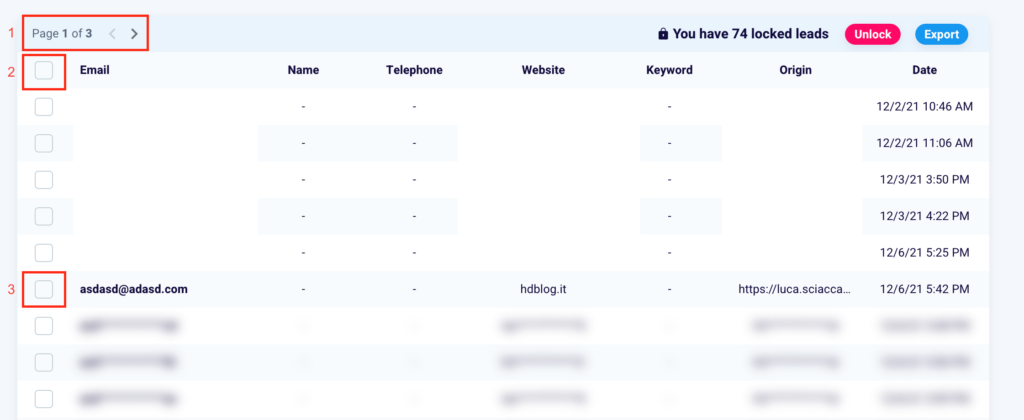
You can move from one page to another by clicking the arrows in the box (1). You can select all the emails collected by clicking the square next to the word “Email” (2) and select a single email by clicking in the box to the left of the specified email address (3).

At the top right of the table you will see the number of contacts you have collected but which are blocked, that is, whose information you cannot know.
Once you have selected one or more emails, you can decide to unblock them by clicking the pink “Unblock” button (2). You can also export the leads and their information by clicking “Export” (3).
In case you decide to click “Unlock” you will see this screen.
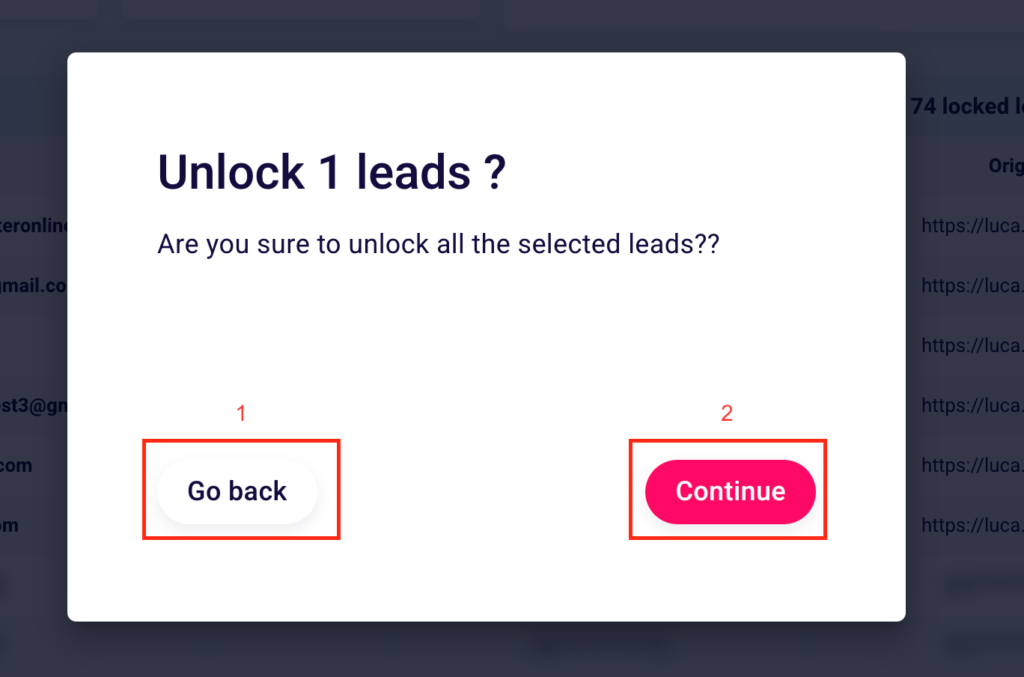
Click “Go back” (1) to cancel the operation and “Continue” (2) to confirm what you have done.
If you choose to click the blue button in the upper right corner, then the “Export“ table will immediately start downloading a .csv file containing all the information of the selected leads.
How to change form settings?
Click on “Settings” (3) in the top menu to get to the respective section.
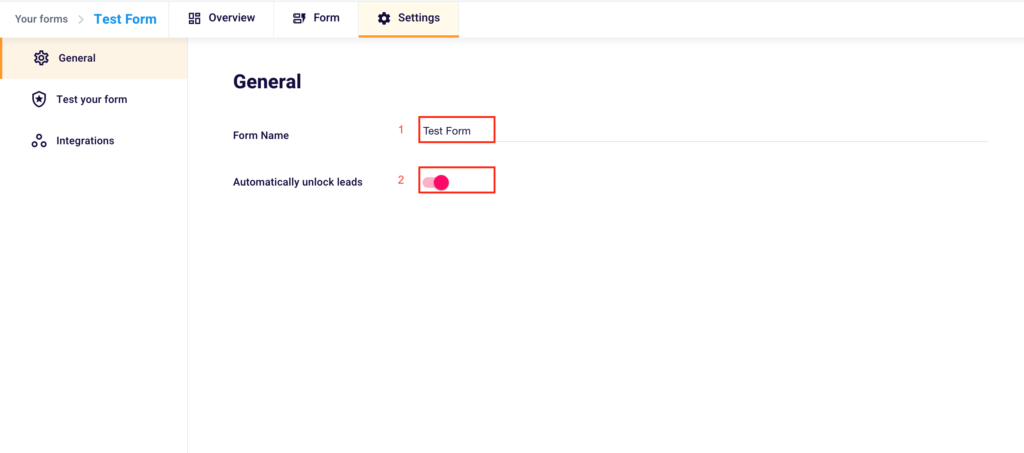
Here you’ll be able to rename the form, typing the new name in the box to the right of “Form Name” (1) and choose to “Automatically unlock leads” (2) once collected, so you don’t have to manually unlock the collected contacts, as shown above.
By clicking “Test your form” on the same screen, you’ll land on this page in the menu on the left.
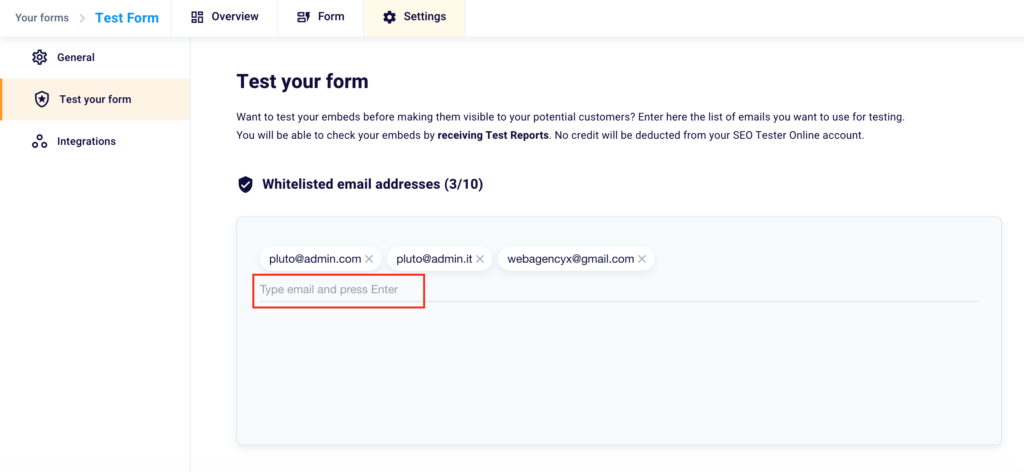
By inserting email addresses in Whitelist you will have the possibility, once you’ve accessed the page where you’ve applied the embed code, to test the form without being deprived of credits.
Once completed you will receive an example report, similar to the one that will be generated for your future customers.
To verify your embeds you just need to insert an email in the box highlighted in the image and click Enter. Click the “X” to the right of the addresses already inserted to delete them.
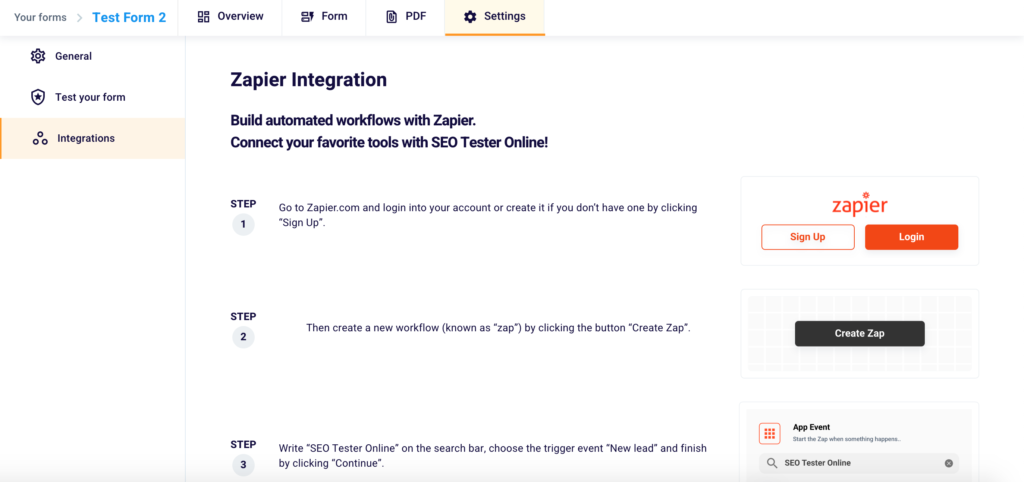
Thanks to the side menu you can easily reach our “Integrations” section. Here you can discover how to connect your favorite digital marketing tools with SEO Tester Online. To do so, just follow the 4 steps illustrated in the section.
For other doubts or questions do not hesitate to contact us at support@seotesteronline.com.